
IMPRESSION INSTRUCTIONS

Contents of your impression kit;
-
Impression putty – Blue x3 (Putty Base) & White x3 (Putty Catalyst)
-
Impression trays – upper (the full tray) & lower (the half tray)
-
Impression medical bag with your name on
-
Return address label - You must pay for postage at the post office for it to be returned.
- Post card to write your design requirements on.

ESSENTIAL REQUIREMENTS
-
Stopwatch to time the stages it is essential to follow the times in all steps.
-
Mirror – to help take a good impression
-
Please read all the steps before you start.
-
Please remove any dentures before impression taking.
PLEASE NOTE
-
During hot summer months please store your impression putty in the refrigerator before use.
-
The impression putty should be allowed to warm up to room temperature before use.
-
The impression putty is a commonly used high grade dental impression material. Material safety data information available on request.
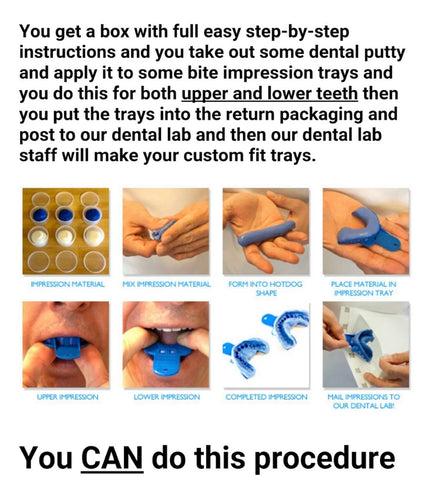
UPPER IMPRESSION

STEP 1
Select upper tray. The upper tray is the full tray.
Practice putting the tray in your mouth before starting the process. If you find that the impression tray is too large or too small. Please contact us before using the impression putty and we can then send out replacement trays. Please contact us if you are unsure about the impression tray size.
Please wash your hands. Take 2 moulds of putty 1 x blue and 1 x white out of the tubs and place them in your hand - Please note once they touch each other they will set hard within 60 seconds.


STEP 2
Mix the putties together in your hand until they form a putty of one uniform colour. There must be no streaks of white.
Roll into a sausage and place into the impression tray.

Using your thumbs gently push the putty into the outer edge of the tray. You should not see the edge of the tray.
NB
You have 1 minute until the putty begins to go hard.
STEP 3
Looking in a mirror, open your mouth as wide as you can and using both hands inset the impression tray in your mouth.
NB
Ensure teeth are aligned in the middle of the putty.
Step 3 and Step 4 to be completed within 1 minute
TIP – Ensure there is plenty of putty towards the front edges of the tray in order to capture both your teeth and gums – then bite as deep as you can until your teeth touch the bottom of the tray.

STEP 4
Firmly pushing the tray upwards make sure you lift your top lip up and out of the way whilst pushing the tray straight up into your teeth. This is because we need an impression of your gums too, not only your teeth. Do this until your teeth hit the bottom of the tray and hold in position with thumbs for 4 minutes, do not speak.
STEP 5
After 4 minutes, push your index fingers up into your cheeks until you feel the rim of the tray and GENTLY prize down until the tray comes free. Rinse with cold water and allow to dry naturally.
NB. Do not remove the putty from the impression tray. Send it back in the tray.
GOOD IMPRESSION
You can see all of your teeth clearly in the impression tray.
You can see a deep outline of your gum above your teeth.
✘ BAD IMPRESSION
Teeth look stretched or distorted.
Bite is shallow.

No gum line is visible.
STEP 6
Please follow steps 1 – 5 again this time for your lower impression.
Place your completed impressions in the enclosed medical bag with completed order form and return. Enclosed is a self adhesive return address you can stick this to the original postal envelope covering your address over. You pay for the impressions to be shipped to us and we pay for the delivery of the veneers to you.
Take your impressions to the post office. Putty and trays are worth no more than £10 - $15 so make sure when the post office ask you how much is the package worth to say £10 - $15 or you will be charged a customs fee.
Once your impressions are made into clip in veneers we ship them to you and we pay the customs fee.
We will manufacture and send out your custom fit clip in veneers within 14 working days or 3 working days depending on which you have chosen.
Check list;
- Take your upper and lower impressions
- Place in the clear bag provided with your name on
- Fill out your post card with your design requirements
- Take your impressions to the post office and pay for 1st class tracked post back to our lab.
- If you are an international client you must tell your shipping company that putty and trays are worth no more than $15 in this form or you will be charged a customs tax. We pay the customs tax for you when we ship the product in veneer form!
If you need any help at all we are always on Facebook chat or instagram.
To conclude;
This is a good example of how to take a dental impression https://www.youtube.com/watch?v=uB0Ogn61RKg&feature=youtu.be
